Friday, May 11, 2012

Showered with Love!

Since my mom and step-dad came to visit last weekend, I finally have some photos to post of my baby shower in Wisconsin! It was such an amazing day spent with family and friends - who SHOWERED us with love and gifts! Baby Olive is going to be the best-dressed guy on the block! :) There was so much time and thought put into the day by my mom and sisters - how blessed I am to have them!

 The decorations were based on Eric Carle (the same theme as the nursery!) and my sister, Janessa, even made a caterpillar out of cupcakes! So sweet! (and those caterpillar balloons were my favorite!)
One of the most special keepsakes from the day are the 'wishes for baby' cards that every guest filled out. They are a series of writing prompts that turned out to be so unique and fun to read. I think it's so fun to be able to show baby boy someday the hopes and wishes that the people who care about him most had- before he was even born!
Janessa was also up until the wee hours of the night the night before the shower baking mini chocolate chip cookies to fill these sweet little 'carry out boxes' for favors!
The other activity that guests participated in at the shower was the 'Onesie decorating' project. (I'm really not into the traditional 'shower games', so this was a perfect alternative) Every guest was given a onesie (or a bib) and using Heat-and-Bond created a design of their own out of fabric pieces. We had some templates available, but so many people came up with very creative ideas on their own, too! Baby boy now has a ton of onesies - each one very unique and special! (Seriously, they're SO CUTE!) Both activities were so fun because the kids and adults alike could participate - and were so good at it! I can't wait to see baby boy dressed up in his adorable onesies!
THANK YOU THANK YOU THANK YOU to everyone that was there to celebrate - and a HUGE THANK YOU to my mom and sisters for putting in so much time to make it perfect! I love you guys!
And because somehow my mom and I didn't get a photo together on the day of the shower, here are a couple of shots from Easter the next day with my family :)

THEN...
After we returned to Indiana, it was my turn to host 'Bunco night' at my house (yes, believe it or not, I joined a ladies Bunco group... and LOVE it!) When the ladies showed up at my house, they surprised me with another impromptu baby shower!! They brought everything from the food, to the cake, to the gifts (more adorable outifts!!), to the balloons, to the confetti! It was amazing!! (Needless to say, not much Bunco was actually played... :)
Not only did Mary make the DELICIOUS cake from SCRATCH, but Katie crafted up a little stroller fruit bowl! What amazing, creative friends I have!! (and are those little socks not the CUTEST thing you've ever seen?!) It was such a fun night, and I'm truly grateful to have found such a great friends in this group of women!

Friday, April 20, 2012

Mommy Moment

Forgive me for my posts being so few lately, I've been working on quite a few (more) projects around here, using as much of the time we have left to work through my 'before-baby-comes-to-do-list'. 

Baby is still doing really well (and so am I!) He's been facing head-down for the last two visits with our midwife - which is great as long as he just stays that way and doesn't switch directions in the coming weeks! He's been so active, and his acrobatics are starting to affect my sleep! (but I still love feeling him move... even at 3 a.m. :) I feel like I'm getting bigger by the day - For fun, here's a visual of how far we've come in the last 4 months:
I've been working quite a bit the last couple of weeks, but will be virtually done after next week! Baby boy is a very good side-kick and has been a good sport about allowing me to cart around photo equipment and tolerating a camera bumping on his head (or his bottom!) from day to day. Although my body has thankfully allowed me to do quite a bit of physical activity at work, I'm grateful to be winding down, as it's been taking me progressively longer to set-up, take-down and load and un-load equipment.

We had an AMAZING (although short...) trip home to Wisconsin two weekends ago - to attend a baby shower that my mom and sisters held for us. (I will be posting more on that (with photos!) shortly - it was absolutely perfect!!)

Last weekend, we took Bella to Turkey Run State Park and got to take a hike in one of the most beautiful areas we've found in Indiana yet! It was a gorgeous day and the landscape is so unlike Indiana (so... NOT flat!) that we almost forgot which state we were in for an hour or so! (For those of you Wisconsin-ites, it was a lot like Devil's Punchbowl - only more of it!)

Sunday, April 1, 2012

Baby Quilt: Finished!! (finally...)

About 4 months ago, I decided I wanted to make a quilt for Baby Olive. It took me awhile to get started because it is, indeed, my FIRST quilt and I was pretty nervous about how/where to start. I bought a book (I chose BHG's Complete Guide to Quilting for the great step-by-step pictures inside!), picked out an amazing PATTERN TUTORIAL from Little Birdie Secrets (finding this tutorial is what inspired me to want to make a baby quilt in the first place - it is SO cute and the instructions were AWESOME! -and very simple for a first-timer like me!-) and chose a color scheme (I decided on lime green, teal, and brown - I didn't want it to be too 'pastel-y, but wanted him to be able to grow with it)

It took me forever to pick out the fabric and even longer to figure out the square combinations. BUT- once I got started, piecing together the blocks went really smoothly and before too long (2 months...) I had almost completely finished the quilt top.

That's when things start to get hairy.

In my never-made-a-quilt-before ignorance, I -on a whim- decided that I should throw the quilt top (before adding the outside border) in the washing machine on the 'normal' cycle. When I came to pull it out, this is what I found:
 An EPIC DISASTER.  
It was a tangled, ripped, frayed, pulled-apart-at-the-seams mess. 

I had myself a good long cry (I can blame hormones for that, right?!) and I was SO UPSET with myself for totally ruining 2 months worth of work in the time it takes for a spin cycle to complete. Seasoned quilters out there are probably wondering why in the world I would wash it at this point - especially on the normal cycle... to which I will plead 'pregnancy brain'. I'm still kicking myself for thinking that washing it before it was put together was a good idea... BUT that's how lessons are learned, right?! (why is it that I always seem to learn lessons like this the hard way?)  

So, I dried the tears, chalked it up to a learning experience, and promptly drove to the fabric store to pick up more of the same fabric to make Quilt #2. Yep. The same day. I was more determined than ever to make this quilt happen. It took me less than 1 week to finish piecing together the top (did I mention that I was determined?) and after ordering a walking foot to fit my 1989 Kenmore sewing machine (which took a few weeks...) I was able to sandwich the quilt together, add the quilt lines and binding and VOILA! Quilt #2 turned out even BETTER than Quilt #1!

The gathered block centers are my favorite part - they make the quilt so much fun and full of texture!
The border fabric is a white-on-white dots pattern - the perfect touch to an otherwise plain border
(without making the design too busy)
The backing fabric is 'minky' (THE softest fabric of all time) and it was great to work with because
it didn't slip around too much and it doesn't shrink when washed!
Do all the blocks line up perfectly? No. Are all the quilting lines even? No way. 
BUT- the quilt is overall square and VERY WELL SECURED (we don't want any repeat performances of the EPIC DISASTER above...). It has a heck of a lot of character and a really good story (of course, this is one of those stories that is only 'good' in hindsight). 

This is a true labor of love that involved a lot of blood, sweat, and tears (literally) and I'm proud to say that my first ever quilt will be my first gift to my first child. Pretty cool, I think. :)

Monday, March 12, 2012

PROJECT LIFE: The Beginning

Last week, Justin and I were supposed to be road tripping to a resort in Tennessee as our final little 'single'  vacation before baby arrives (We realize we still have lots of time left, but we have a busy couple of months coming up and I'm not sure how comfortable a 8 hour road trip will be in a month or so...) but he had some things at work come up at last minute and we weren't able to go. 

Although I was really bummed, I decided to keep my week off from work and get some things done around here! It was actually really great to have some 'me-time', because I know before too long those moments will be few and far between! 
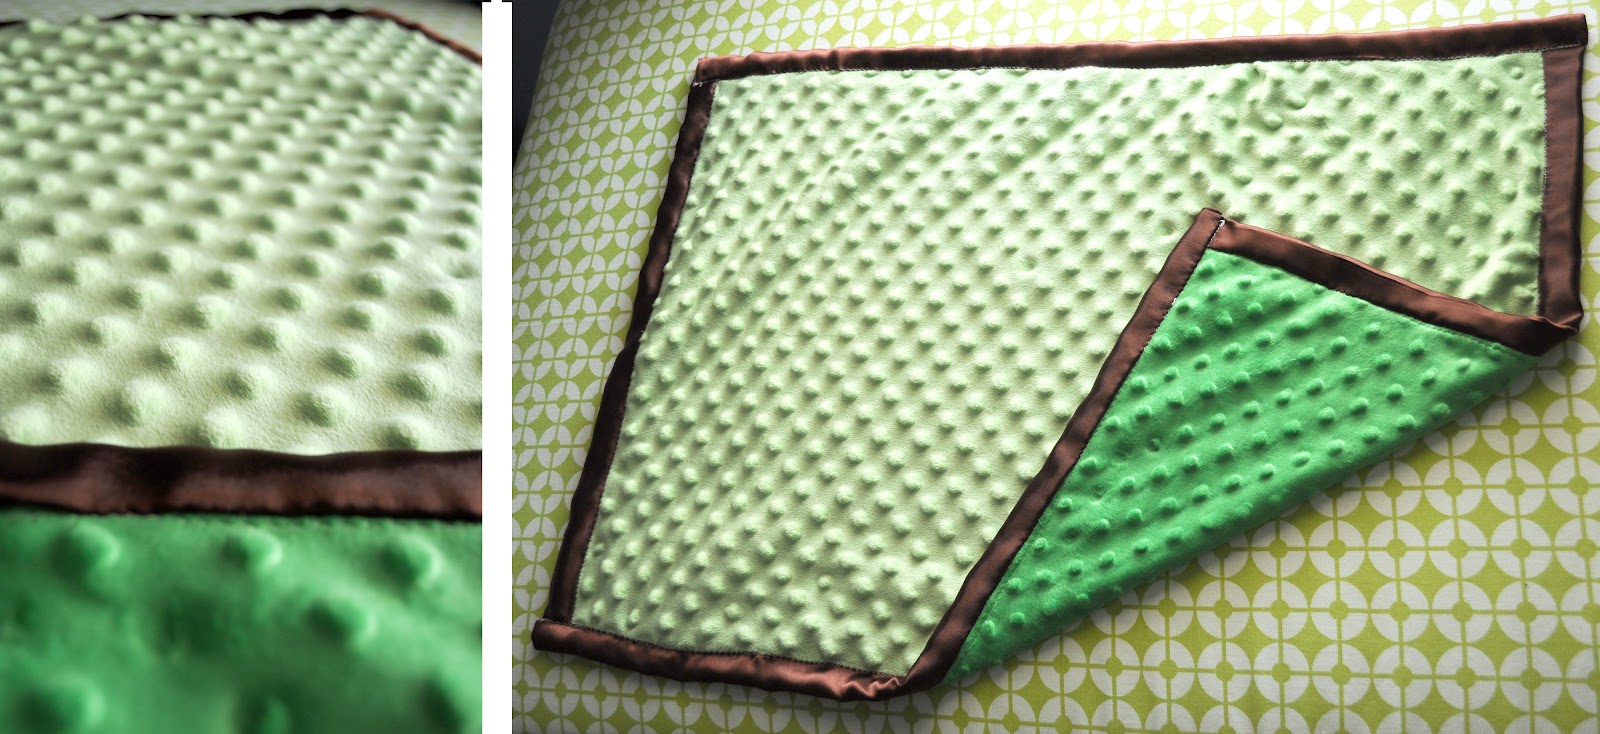
I got in plenty of walks with Bella, did lots of reading, made a quick mini blanket out of some scrap 'minky' fabric I had leftover from the baby quilt I'm working on **(which will hopefully be finished in the next couple of weeks!)**
If you haven't heard of Minky ... or FELT it, I highly suggest you do! It is THE. SOFTEST. MATERIAL. EVER.
AND.... I spent LOTS of time kicking off my NEW LONG-TERM PROJECT!! This project is very much like my Project: 365 that I finished up in December, as I hope to post my progress weekly. 

I've never been much of a scrapbook-er, mainly because of the time that goes into each page - I have a problem committing so much time to any one layout and I have WAY too many photos to only put just a few on each page ... so THIS is the answer! 

PROJECT LIFE.
(Ironic how I keep choosing these projects named... Projects!) 

Project Life is a form of scrapbooking, but focuses more on recording daily life memories and moments rather than big events. It also requires much less of a time commitment, and records the small things everyday that are often forgotten. Instead of working on ONE page for ONE event, Project Life has specially-designed pages for quickly slipping in photos and journaling cards to write down quick memories, events, etc. Check out Becky Higgins' website for the complete low-down. (she's the genius behind the idea!)

I bumped into the idea on accident while checking out my friend, Lindsey's website and she opened my eyes!  (Thanks, Lindsey!) and the more browsing I did online, the more people I found doing amazing things with this idea!  

I started off the project by picking up a basic 3-ring scrapbook binder at Hobby Lobby and ordering a variety pack of different page protectors and some blank journaling cards from Amazon. These things should get me through the whole year! (with some journaling cards that I make myself - or find free printables online!)

I'm going to use my first book as a form of a 'baby book' to record all the memories/events/moments from Baby Boy's first year - starting with my pregnancy and our preparations. I've gotten a pretty good start on the first 5 pages, which I've shared below! (They aren't completely finished, but I couldn't wait to share!)

I was so excited for these little boxes to show up in the mail!!


Using some scaled-down 8 1/2 x 11 page protectors, I was able to display the 'baby pages' I've been making every month while creating layers in the book!)
What's nice about these pages is that the ultrasound photo that is currently in a frame in the nursery can easily be slipped into the top left slot when I switch it out of the frame!
This project is a perfect way to organize the 'little things' that I hoard collect - like appointment cards and receipts for special items!
I'm hoping once baby arrives, I'll be able to fill one spread (2 pages) every week for the first year of his life. The pages come in 6 different layouts, allowing for lots of photos/journaling cards or just a few, whatever I get done that week!  (I like the no-pressure take on scrapbooking - I might actually be able to keep up with it!) I highly suggest you check out Project Life - go to Becky Higgins' website or Google it - it's amazing what other people are coming up with!


Let's just say the nesting has begun... or is continuing... I'm pretty sure I've been 'nesting' since I found out I was pregnant :)

Thursday, March 1, 2012

Mommy Moment


Forgive the delay - I am actually 26 weeks today and we had a doctor's appointment to test my sugar/glucose levels. We also got to hear baby's heartbeat and found out that he's still measuring at about 27 weeks - so a week 'ahead'. Everything looks good so far - he certainly is becoming more and more active!


Meanwhile, in the dining room, spring has sprung and the bulbs I planted a couple of weeks ago have started to bloom - there are some Hyacinths in one window and some Tulips in the other! They smell wonderful and make the room so much more bright! (they also make me long for spring to really start!)


I also used some ripe bananas that I had stored in the freezer to mix up this delicious banana cake with peanut butter frosting. (the frosting is really sweet, but it MAKES the cake!)
Link to the recipe HERE
P.S. I've got a great new project in mind - I can't wait to share it with you after I collect my ideas! :)

Saturday, February 18, 2012

Nursery REVEAL!

I'm so excited to say that the first photos I show of the nursery are of it in it's finished state!!  Justin and I are the kind of people that when we get an idea in our minds, we're so excited to see the final product, we obsess over it a little. (ok, so maybe I was doing most of the obsessing, but Justin was a willing partner :) We've been working over the past few weeks on evenings and weekends and love the way that it came together! 

First of all, it is by total coincidence that the walls in baby boy's room are 'baby blue' color. This room was painted this color when we moved in and we chose it for the nursery because it is by far the brightest room in the house and was the easiest to transition into a nursery. (It was my 'craft room' for all of 4 months... it was nice while it lasted :) If baby ended up being a girl, we were going to keep the blue walls and just add lots of pink accents around the room to make it more of a 'girly' space.
BEFORE picture of the room... when it was in transition from my office to the nursery

We chose to go with an 'Eric Carle' theme (for those of you not familiar, he's the artistic genius behind The Very Hungry Caterpillar children's book, among many others.
We wanted something that was going to be gender-neutral and would last beyond the 'baby' years - I know many 7-8 year olds who still love Eric Carle! (Heck, I'm 26 and I still love him!) His work is made up of numerous different bright colors and textures arranged collage-style into animals and other natural elements. His books are also written in a very repetitive fashion, making them perfect for beginner readers. His whole style rocks my world... I see many themed Eric Carle events in our future... birthday parties, art parties, maybe even a trip to the Eric Carle Museum of Picture Book Art in Massachusetts? :) Oh, the possibilities!


This is the collection of Eric Carle prints that are placed on the wall above the crib. For safety's sake, the frames are screwed directly into the drywall on both the top and the bottom. No, the frames won't be able to be re-used as 'normal' frames again and Yes, the wall now has 18 large holes in it, BUT we can rest easy knowing there is NO WAY they will fall off or baby can pull them down. Plus, we can always switch out what's IN the frames, they will just always have this arrangement. (knowing how I am with decisions in general, not to mention PERMANENT ones, this layout took me many nights of swapping the frames around on the floor.) 
 
I got the 3 large (12" x 18") images from this book and the smaller ones I scanned some of these alphabet flash cards and printed them different sizes to fit the frames. Both the book of prints and the flash cards are AWESOME! The flash cards are large (good for small hands) and made of thick book board - each card also has a corresponding animal whos name starts with the letter on the card! Double awesomeness! 
The Book Wall. It was inspired by many similar ideas I found on Pinterest (who says Pinterest is a waste of time?! :) It will serve as a functional storage place for books, plus will be a rotating art gallery of book covers! We just picked up some unfinished shelves at Menards for $9 each, painted them white to match the trim in the room, and attached them with anchors and screws.  

1. We picked up this sweet little amphibian at a flea market when we went to go visit Justin's sister and her family in Texas in 2007. We have very fond memories of this trip, as it was our first ever together (and we had only been dating about a month at the time we took it!) 

2. This was one of Justin's childhood toys - The Happy Apple! (I'm pretty sure it's considered 'vintage' now) It's a wobble and chimes when it moves - it fits in perfectly in the room and I'm sure baby boy will love it just as much as his papa did!

*Book note: Thank you to Kohls and to my mother for frequenting Kohls for having Eric Carle books/stuffed animals as their current 'Kohl's Cares' fundraiser campaign. My mom brought baby the kangaroo book (and matching animal, of course :) and we picked up 2 of the other Eric Carle books for $5 apiece! AWESOME! And what great timing! They also have a really fun line of Eric Carle educational toys too!! 

The Changing Station is all ready and set to go, all it needs is some supply stocking! The diapers will eventually be put in the cloth bins, changing accessories in the basket, and lots of super sweet clothes in the drawers.
1. This 'Mandala Tree' embroidered wall hanging was a gift from Lisa (at Git Down Kitty) -See more information about Lisa and the creation of this masterpiece on this post. This is an inspiration piece and looks like it was made for this room and its blue walls. 

2. This frame will eventually house a 'name collage' that I will create and hang once baby comes. It will include name, birth date, birth time, weight, length, etc. (another Pinterest-inspired project!)

3. This frame is where baby's hospital bracelet will be saved. I love the idea of incorporating little personal trinkets/memorabilia to make the room more unique! 

The contents of the other frames are still somewhat unknown. I have many ideas and so little space! :)  I'll keep you posted.


The Cuddle-Nook is the brightest spot in the room (in the whole house, probably!)
and is the perfect size to accommodate lots of cuddling :) 

1. More Eric Carle prints - scanned and printed from flash cards. I thought these 3 sea life prints went really well together on this wall and remind Justin and I of our amazing scuba-diving adventures!

2. Tie backs I made out of leftover fabric from the window seat/toy box. They are really easy to latch and un-latch to close the much needed light-blocking curtains for naptime! I loosely followed this tutorial and attached them to the wall the same way.

3. This is a glass mosaic piece made by my sister when she was in high school (obviously, I love it because it's a panda, but more because she thought to give it to me! :) It fits perfectly in this room!

4. Our custom-built window seat/toy box! (an original design by Justin!) See all about how we made it here.


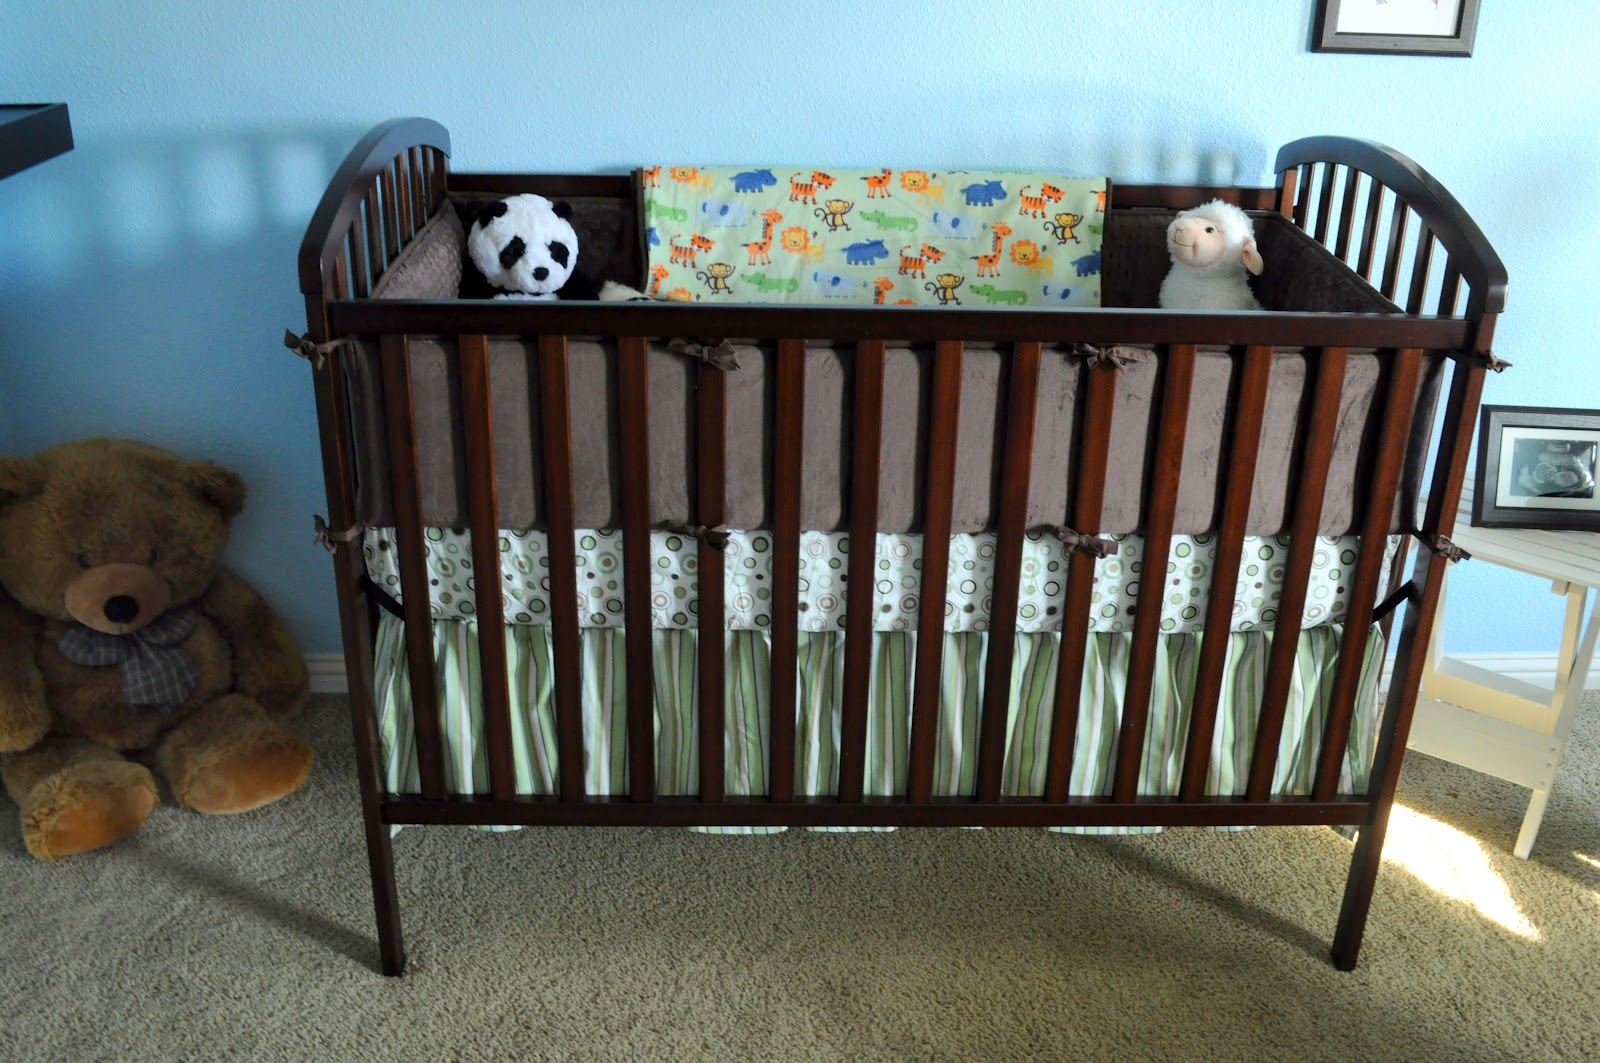
The super-cozy Crib (and the uber-soft bedding that was sponsored by baby's grandma Jodi :) 

All of the bedding is made by Carters and we ordered it online from JCPenny. Instead of ordering a 'set', I opted to mix-and-match different patterns/textures to help it fit the room. This set is also very gender-neutral if we have a little girl someday, just add a pink patterned sheet, and voila! :) 
I was originally going to skip the bumper pad, but after feeling this one made of the softest cotton ever ('minky' I hear it's called), I couldn't resist. It also really helps make the crib seem more cozy and 'finished'

...and last but not least....

Obviously, this photo was taken before the bedding had been delivered - just stare at the light :)
The Light Fixture. I fell in love with this fixture from Ikea when I first saw it and was just waiting for the opportunity to buy it for a room! I love it not only because it just looks really neat during the day, but because of the AMAZING shadows it casts at night! We're using this in place of a mobile over baby's bed - how fun would it be to look up at those shadows all night?!  (Of course, he'll be sleeping all night...right?!) We installed a dimmer switch (when I say 'we', I mean my handy electrician, Justin :)  so that it can always be on a little bit - so it's a mobile AND a night-light! It's perfect!
Because we weren't going to Ikea anytime soon, I had my sister pick this up on her way back to Wisconsin a couple of weeks ago and send it in the mail. How exciting to find this (and all 90 pieces inside) on my doorstep!
The flowery parts are just made out of paper, but the fixture requires only a small 40 watt bulb - so no fire hazard! (and although there were 90+ pieces, it was really easy to assemble  - it just snapped together!)

The Finished Product:
View from the door

View from the closet (Just as we suspected, Jasper has completely taken over the window seat - he rarely leaves that spot during the day when the sun is out!)
View from behind the glider


Monday, February 6, 2012

Our Nursery Window Seat/Toy Box!

After browsing Pinterest for hours days, I had mentioned to Justin how great it would be to have a window seat bench in our nursery, seeing as the wall randomly juts out next to one of the windows, and it would be nice to have some extra seating in the room. A couple of days later, I came home from work to a pile of lumber and Justin's drawn-out plan for the bench!  (What a guy :) 

It took us a weekend to construct it (When I say 'us', I was really only the board holder/nail handler/sidekick) and then another week to paint, order/receive the foam and choose fabric. (it took me numerous trips to the fabric store to decide on a fabric... I'm THAT girl that stands in front of a wall of fabric bolts for an hour and then leaves the store with nothing. It's torture)

We chose to not actually 'install' it in the room so that we had the freedom to move it around in the future and we didn't have to destroy the walls around it. At first we weren't going to put walls on the inside, just put some fabric baskets in there to hold toys, etc., but then decided that it would look much more finished with the interior walls so it made a trip back down to the garage for the finishing touches.

After painting the outside white I had the wild idea to paint the inside a bright, contrasting color for a little 'surprise' when you open it up, so on a recent trip to Lowes, we browsed the reject mis-mixed paints and found a gallon of a bold orange color for $5. How can you beat $5 for a whole gallon of paint?! So orange it was!! (by the way, if anyone is looking to paint something bright orange, let me know... I have about 3/4 of a gallon just sitting around :)

I am by no means upholstery-savvy, but for my first project, this one was easy and turned out pretty well - the fabric seems really secure to the board and doesn't have much give, probably because it's attached underneath with no less than 1,000 heavy-duty staples.

Overall, this project ended up costing us about $150 which, to me, seems like quite a bit but things add up! (lumber, foam pad, fabric, hardware, paint) But after thinking about it, we couldn't have gotten one like this that fit perfectly into our space and is so STURDY (Seriously, I invite you and your two largest friends to take a seat... this thing won't BUDGE!) for less than what we paid for materials. The final dimensions are about 3.75 ft x 2.5 ft on top and 2 feet tall. It will be perfect for hanging out with baby catching some afternoon sun :) (Plus it has SO MUCH room inside to store toys and 'stuff' - what kid doesn't love a toy box?!

The front of the box will eventually be home to some wooden letters spelling out baby boy's name... but we're keeping that one a secret until June. Sorry! Check back for an updated window seat post around then! :)

... And for those of you wondering, the bench has already become a favorite hang out for our furry friend, Jasper. He pretty much thinks he owns the place and we built the bench for him to get a better angle at the afternoon sun/view of the neighborhood. (we don't have the heart to tell him differently... he's in for a big enough shock-to-the-environment come June, we don't see the need to take away the last few months of peace and quiet that he'll enjoy in this room. We're such suckers for that furry face :)

Saturday, February 4, 2012

Mommy Moment

I'm going to try my best to keep you updated with the progress of my pregnancy without totally taking over my entire blog talking about it (although it IS pretty much all I think about these days!) 

Please don't confuse the 'parts' - refer to the arrow :)
We found out at our ultrasound appointment a couple of weeks ago that...
Baby Olive is a BOY! 
We're super excited to meet this little guy - sometimes it seems like 9 months takes forever, and sometimes it seems like it's flying by! It seems my belly has emerged in full force in the last few weeks, and I've recently been struggling with my wardrobe in the mornings. Although I have purchased some maternity clothes, it seems those are still a bit too big, while my regular clothes are a bit too tight... it's an adjustment :) 


I've been making a 'journal' of sorts that incorporates the belly photo we take every month. It's more of a monthly letter to baby boy to keep him updated on his growth and see what kinds of things were happening in the months leading up to his birth. Maybe I'll bind them in a book of some sort for him. Here's our 20 week page:


Also - we got to take a few short video clips from the ultrasound with us - I've been watching them over and over ever since. Enjoy! 


Friday, February 3, 2012

I'm Back!

These past few weeks, since my 365 project has been completed, I've been taking a hiatus of sorts from blogging/spending so much time on the computer in general. It's nice to disconnect sometimes - it's amazing how much extra time I have when I'm not spending it all aimlessly browsing the internet! (I have to admit, I have still been checking in with Pinterest from time to time... I just can't get enough of the inspiring ideas I find on there!) 

In my new-found free time, I've been working/crafting/decorating/entertaining and enjoying the amazing weather we've been having in Indiana!
----------Here's some of the highlights-------

20 weeks = Hello... BELLY!
- I've been in awe of baby's increasing movement inside me. I was at a conference for work earlier this week and found myself starting down at my belly for extended periods of time WATCHING my belly poke out every time he gave a little kick. It's just an amazing thing!

- The decorating of Baby Olive's room is practically FINISHED! (I got nursery fever a couple of weeks ago and couldn't shake it, so we just went ahead and got to work while the mood was striking us!)

- My mom, step-dad, sister & brother (+ his girlfriend) came to visit last weekend so we could celebrate a belated 'Christmas' together. IT was so nice having them around for a few days - our house came to life!

- I started working on my first-ever QUILT for baby boy - I have all the pieces cut and have started assembling the blocks! I'm so excited that it's going according to plan and that I have an incentive (and a June 'deadline') to move from 'just practicing' to the real thing!


I've also been working on a few miscellaneous projects around the house that I've had the energy lately to start- AND FINISH!  I'll be posting photos of all these exciting happenings in the next few days- stay tuned! :)